How to Record Video With the DJI Neo 2
Peter Leslie
22 May 2026

If you have just unboxed the DJI Neo 2 and you want to know which button actually starts a clip, where to set the resolution before takeoff, and how to confirm the drone is rolling, this is the exact sequence to follow. Most new drone pilots trip on the same two things — they leave the drone in photo mode by accident, then press the Shutter / Record button and wonder why it took a still instead of a clip.
The record button on the DJI Neo 2 lives in three different places depending on how you are flying — the DJI RC-N3 shoulder, the front face of the DJI RC Motion 3, or the on-screen icon inside DJI Fly. Whichever you use, the recipe is the same: switch to video, set the resolution, press once to roll, press once more to stop.
Quick guide
To record video on the DJI Neo 2, go to DJI Fly → Camera view → Video mode → Shutter / Record button. Pick your resolution on the chip on the right edge, press the Shutter / Record button on the controller or the on-screen icon to roll, and press it again to stop. The red dot and the running timer confirm the clip is being written.
Step-by-step: How to Record Video With the DJI Neo 2
Follow these top to bottom the first time, and you will know the path off by heart the second time.
Connect the DJI Neo 2 to DJI Fly and open the camera view
Power the drone on, wait for DJI Fly to link to the drone over the controller or Wi-Fi, and tap the green Go Fly tile to load the camera view. The live feed from the drone fills the centre of the screen and the shooting controls run down the right-hand edge.
Switch the DJI Neo 2 into video shooting mode
Tap the shooting-mode icon on the right-hand control column and select Video from the list that slides out. The record icon and the resolution chip only render when the drone is in video mode — in photo mode the same column shows the shutter icon and megapixel options instead.
Set the resolution on the chip on the right-hand edge of the camera view
Tap the small resolution chip just under the shooting-mode icon and pick from 4K, 2.7K, or 1080p. Most drone pilots leave 4K on for horizontal client work, switch to 2.7K for any vertical edit going to Reels or TikTok, and drop to 1080p when slow motion or storage matters. The full path is covered in the resolution walkthrough.
Pick the frame rate inside Pro mode Preferences for the delivery
Tap the Auto/Pro toggle in the top corner of the camera view to switch into Pro mode, then tap the parameter row to open Preferences. Pick 25 or 30 frames per second for a standard timeline, 50 or 60 for a smoother look, or 100 for a clean slow-motion pull at 1080p. The DJI Neo 2 sticks to the chosen frame rate until you change it.
Check remaining storage from the settings panel before takeoff
Tap the settings cog on the camera view, scroll to the storage block, and confirm at least a couple of gigabytes free for the clip you are about to shoot. The DJI Neo 2 refuses to start a new recording the moment storage hits zero, and clearing space mid-flight is a faff you do not want.
Press the Shutter / Record button on the DJI RC-N3 to start the clip
On the DJI RC-N3, the Shutter / Record button sits on the top-right shoulder next to the gimbal dial. A single press starts the clip immediately. On the DJI RC Motion 3 the equivalent is the round button on the front face opposite the joystick — same single-press logic.
Tap the on-screen record icon in DJI Fly when flying phone-only
If you are flying without a controller in Mobile App Control, the red record circle sits on the right edge of the live camera view. Tap it once to roll, tap it again to stop. The icon pulses while recording and the small running timer at the top of the screen confirms the clip is being written.
Confirm the red recording indicator and the timer on the camera view
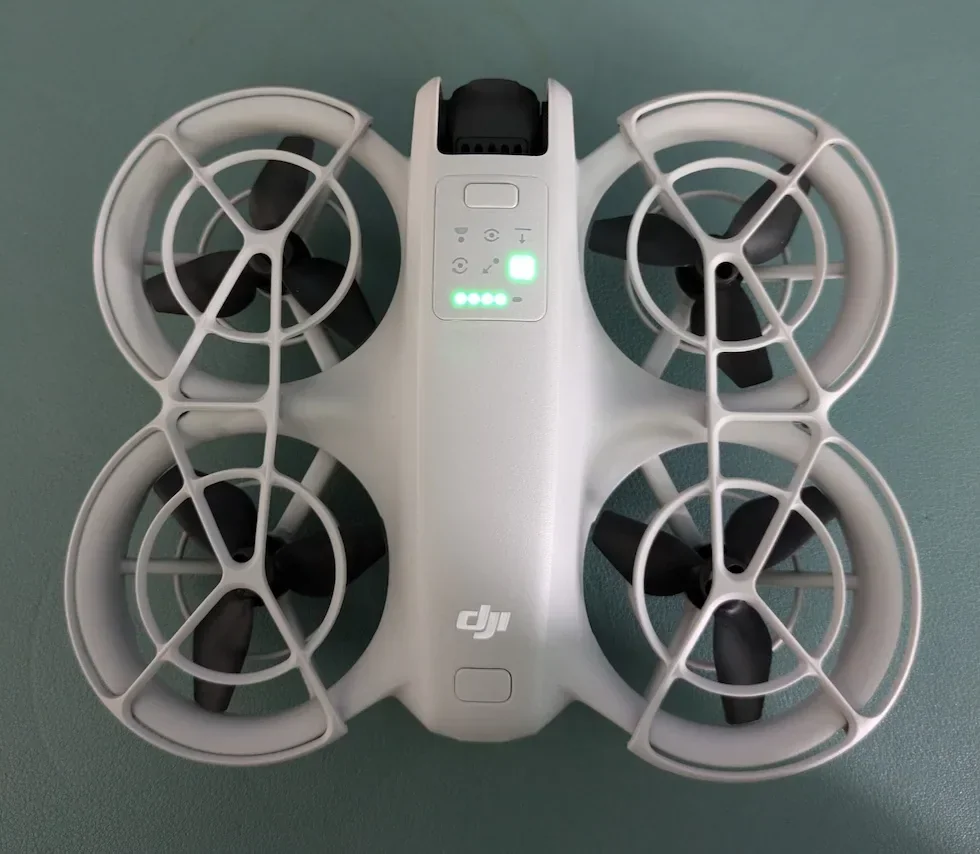
A red dot appears next to the on-screen record icon and a clip timer counts up at the top of the camera view. The drone's status indicator on the body of the DJI Neo 2 also shows a solid white pattern while video is being recorded — the visual confirmation that the clip is rolling regardless of which control method you used to start it.
Press the same button again to stop and write the file to storage
A single press of the Shutter / Record button or the on-screen icon ends the clip. The DJI Neo 2 writes the MP4 to internal storage (or to the microSD card if one is fitted) and the timer resets. Give the icon a second to return to its idle state before powering the drone off — pulling power mid-write can corrupt the file.
Peter's tip
I start the clip on the ground before lift-off on almost every shoot. The DJI Neo 2 will sit there recording the rotors spooling, the takeoff, and the climb without a single cut — and a continuous file gives the edit a much cleaner intro than one that starts halfway up. Trim the dead first second in post, never the other way round.
Frequently asked questions
Which button records video on the DJI Neo 2?
The Shutter / Record button on the top-right shoulder of the DJI RC-N3 remote controller, the round button on the front of the DJI RC Motion 3, or the on-screen record icon on the right edge of the DJI Fly camera view. A single press starts the clip and a second press stops it. The drone has to be in video shooting mode for any of the three to roll video — in photo mode the same button takes a still.
Does the DJI Neo 2 record automatically in Smart Snap modes?
Yes. When you trigger a Smart Snap from the buttons on the drone body or from the on-screen mode list, the DJI Neo 2 flies the pattern and records the whole clip start to finish on its own. There is no manual record press in that flow. The finished clip writes to internal storage the moment the pattern ends.
How long can the DJI Neo 2 record on a single battery?
Around 17 to 18 minutes of flight per battery in still air, which gives roughly 15 minutes of usable recording once you allow for takeoff, framing, and landing. The encoder draws a tiny fraction of the power that the motors use, so resolution and frame rate barely move the flight-time number. Carry spare batteries on any shoot that needs more than one take.
Can I start recording before takeoff on the DJI Neo 2?
Yes. The Shutter / Record button and the on-screen icon both work on the ground as soon as the camera view is loaded — you do not have to be airborne. Drone pilots starting a clip on the ground and letting it run through takeoff are using the cleanest workflow, because the clip captures the lift-off itself with no cut. Just remember to stop the recording before you cut power.
How does audio recording work when I record video on the DJI Neo 2?
The phone's built-in microphone records the audio when you enable App Recording in the DJI Fly camera settings, and the audio merges into the same MP4 file as the video clip. A microphone icon appears on the camera view while audio recording is active. Switching apps or turning the phone screen off during a recording will cut the audio, so leave the screen on and DJI Fly in the foreground for the whole clip.
Where do video files save on the DJI Neo 2?
Internal storage by default. The DJI Neo 2 ships with on-board storage soldered to the mainboard plus a microSD card slot for expansion up to 512 GB. If a card is inserted, the storage block in the camera-view settings lets you pick which location each new clip writes to. Pull the files off by USB-C to a computer or by QuickTransfer over Wi-Fi to your phone after landing.
Why will the DJI Neo 2 not start a recording when I press the button?
Three common reasons. First, the drone is in photo shooting mode rather than video — switch the shooting-mode icon to Video and the record action returns. Second, the storage is full — the DJI Neo 2 refuses to roll a new clip when there is no room, so delete some clips from the album or offload them. Third, DJI Fly has lost the link to the drone — pull down the camera view to refresh the connection, then try the button again.
Can I record vertical 9:16 video on the DJI Neo 2?
Yes. Switch to 2.7K resolution in the chip on the camera view and the DJI Neo 2 records natively at 1512 by 2688 in the 9:16 vertical aspect ratio. The frame is written straight off the sensor rather than cropped from a horizontal capture, so the vertical clip is full resolution without the pixel loss you get from cropping a 4K horizontal frame down to portrait.
Recording on the DJI Neo 2 is genuinely a three-step recipe once the resolution and frame rate are set the way you want them: switch to video, press the button to roll, press it again to stop. The piece most new owners get wrong is the storage check — the drone refuses to start a clip with no space and there is no warning until the moment you press record.
If you have a specific recording scenario you want covered — a frame-rate question, a workflow for vertical Reels, a side-by-side test of the on-board mic against an external one — drop a note to peter@hiredronepilot.uk and I will come back to you directly. The video version of this walkthrough is on YouTube and the comments are open.
References
Primary source material for this article is the official DJI Neo 2 documentation and DJI Fly. External links open in a new tab.
- DJI Neo 2 — Technical specifications · 4K (3840 by 2160) up to 100 fps with the remote controller, 2.7K (1512 by 2688) vertical at 60 fps, 1080p (1920 by 1080) up to 100 fps, and the 80 Mbps maximum video bitrate.
- DJI Neo 2 — Downloads (User Manual, Quick Start Guide, firmware notes) · Shutter / Record button position on the DJI RC-N3 and the DJI RC Motion 3, Mobile App Control record icon, App Recording option, and the storage and exporting sections.
- DJI Fly — App download and release notes · The app where the camera-view record icon, shooting-mode list, and Pro-mode Preferences live. Release notes record menu changes between versions.

Peter Leslie
Founder & GVC Drone Pilot
Peter is the founder of HireDronePilot. With thousands of logged commercial flight hours, he writes about drone technology, commercial surveying tactics, and UK aviation compliance.
Connect on LinkedIn